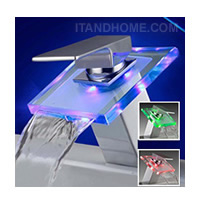
ก๊อกน้ำ LED มีเปลี่ยนสีตามอุณหภูมิ ดีไซน์ทันสมัย
RGB LED Light Glass Waterfall Faucet Temperature Sensor
รายละเอียด ก๊อกน้ำ LED เปลี่ยนสีตามอุณหภูมิ:
• ก๊อกน้ำ LED จะแสดงสีเขียวเมื่ออุณหภูมิต่ำกว่า 32 องศา
• ก๊อกน้ำ LED จะแสดงสีน้ำเงินเมื่ออุณหภูมิอยู่ระหว่าง 32-45 องศา
• ก๊อกน้ำ LED จะแสดงสีแดงเมื่ออุณหภูมิสูงกว่า 45 องศา
• ก๊อกน้ำ LED มีขนาด 30.5*22*14 ซม
รายละเอียดเพิ่มเติม:
-
The LED light is powered by 4 units of AA battery, 1.5V (included in the package), and the light only works while open the faucet .
- This item will change its color by detecting water temperature;
- Durable Solid Brass & Tempered Glass Construction;
- Polished Chrome Finish;
- When water temperature is<32 degree, Green color will show automatically;
- When water temperature is between 32~45 degree,Blue color will show;
- When water temperature is above 45 degree, Red color will show.
-
Weight:specifications: 30.5*22*14cm
Tools You Need for Installation
General Faucet Installation Instruction
Please kindly note that this is just a general instruction, each faucet you buy from us has installation instruction with details inside package.
Step 1: Position the Faucet
A: Begin installing your faucet by placing the gasket and faucet in position on the sink.
B: From under the sink, thread the plastic mounting nuts onto the faucet shanks. Be sure the large side of each plastic mounting nut is up.
C: From the top of the sink, check the faucet and gasket position.
D: From under the sink tighten the mounting nuts, making certain not to over-tighten which could damage the nuts and make them difficult to remove in the future.
Step 2: Attach the Water Supply Tubes
A: Wrap the threads of the water-supply valve with Teflon tape. Although most plumbers use only Teflon tape, some plumbing supply manufacturers also recommend using plumber’s putty.
B: Thread the water supply nut onto the shut-off valve. Tighten the nut with a wrench.
C: Wrap the threads on the faucet shank with Teflon tape, and then thread the water supply nut onto the faucet shank.
D: Tighten the nut with a wrench.
Step 3: Connect the Faucet Lift Rod
A-1: From the top of the sink, insert the lift-rod into the faucet.
A-2: From under the sink, make sure the pivot-rod is in the down position. Insert the lift-rod into the lift-rod strap. Tighten the screw.
B-1: From the top of the sink, make sure the lift-rod opens and closes the drain plug as desired.
B-2: Make any needed adjustments by loosening the lift-rod strap screw and repositioning the lift-rod.
B-3: If you need to connect the lift-rod strap to the pivot rod, slide one end of the spring clip onto the pivot-rod.
B-4: Make sure that both the pivot -rod and the lift-rod are in the down position. Insert the pivot-rod in the closest hole in the lift-rod strap.
B-5: Slide the other end of the pivot-rod. Make sure the lift-rod opens and closes the drain plug as desired.
C-1: Make minor adjustments by loosening the lift-rod strap screw and repositioning the lift-rod.
C-2: Make major adjustments by removing the spring clip and moving the pivot-rod to a different hole in the lift-rod strap.
Step 4: Flush the Fauc- Adjustable wrench
- Tape
- Screwdriver
- Flashlight
รับประกัน 6 เดือน
| ยี่ห้อ (Brand) | OEM |
|---|---|
| รุ่น (Model) | H-14 |
| วิธีใช้งาน | ใช้สำหรับติดตั้งกับอ่างล้างมือ |
| หมวดหมู่ | เฟอร์นิเจอร์/ของใช้ในบ้าน |
| หมวดหมู่ย่อย 1 | สุขภัณฑ์/ของใช้ในห้องน้ำ |
| หมวดหมู่ย่อย 2 | |
| ขนาดพัสุด (Package size) | - |
| น้ำหนัก (Weight) | - |


